|
·
Lapidary (Stone cutting and polishing) ·
Drums ·
Stage 1 - Coarse grind and tumble |
Click on the pictures below to jump to
a larger version...


LAPIDARY (STONE CUTTING AND POLISHING)
The working of stone is perhaps one of the most ancient of all crafts and has
been an attendant 'work' of mankind for thousands of years. Stone was worked into tools for cutting long
before metal even appeared on the scene - Flint and Obsidian are famous examples
of stone fashioned into cutting implements and weapons. Minerals, especially the softer and more
colourful, have been used for decorative purposes, either as an article in its
own right, to it being ground into powder to make paint, these and other uses
for stone predate recorded history.
Later, stone was used for decorative items and was shaped and polished
for jewellery, ornaments, and much else besides, examples of this use of stone
appears all over the historical record.
Today, stone, and stone jewellery are ubiquitous.
It has been said that if Earth was ever under observation by extra-terrestrials, humans would be noted for their fascination with two things - fornication and shiny objects. This page is an account of my fascination with the latter. Lapidary is the craft of cutting and polishing stone. Strictly speaking the name for this craft would be applied to precious stones and jewels, but in a wider sense it includes semi-precious stones as well. It is the latter type of stone that is the topic of this page. At this point it is worth telling how I first became interested in this curious hobby...
Back in 1994 I visited the South Atlantic islands of Ascension and St. Helena, two small volcanic islands that stand in stark isolation among that great expanse of sea. While staying on Ascension I was asked if I wanted to find some Obsidian. I hadn't the faintest idea what that was but went along anyway. It turned out to be a type of volcanic rock - glassy, black, scattered about in a few parts of the island. I collected a few pieces and that was the end of the matter for a few years. However, during that visit I purchased a visitors guide to the island and reading it again a few years later I noticed a small remark about that stone. The book stated that it could be polished and was noted for its lustrous finish. While of no real value the stone nonetheless could be made to take on an a very attractive appearance.
Fast forward to 1999 and during a second visit to the island I decided to revisit the part of the island where that type of stone could be found. Now knowing what to look for I picked up several small fragments and brought them back home with me. Bearing in mind the comment about polishing Obsidian I decided to buy a small kit when I got back to the UK. This kit was a starting pack which comprised a machine, drums, grit, and an assortment of stones - everything needed to kick-start what has become a hobby that has occupied me for nearly 20 years.
![]()
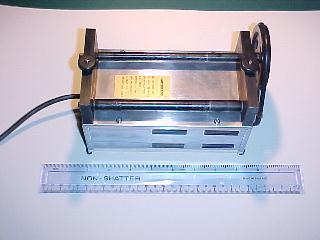
MACHINES
The machines I use are simply a small electric motor that drives a pulley via a
belt. The pulley turns a roller which
sits on top of the machine. A
free-wheeling roller runs parallel to that and it is on these rollers that a
drum sits (and revolves) when the machine is switched on. The picture below shows one of the 4 machines
that I use, all are identical. They have
all been rebuilt to incorporate improvements on the original design and are
fitted with different bearing blocks and use an nitrile rubber 'O' ring as a
drive belt. The re-designed bearing
blocks are made of a self-lubricating plastic/nylon and are much harder wearing
than the original. The 'O' rings are
used since the machines they are cheaper to replace and require no
adjustment. Typically the belts last 9
months and replacement takes seconds.
Each machine motor is rated at 15 watts so although they are in near constant use they do not consume much electricity. The machines turn the drums at about 45rpm. That works out at about half a million revolutions a week! A recent calculation showed that each machine consumes about 30p worth of electricity a week. (Click on the picture below to see a larger version. Use the 'Back' button on your browser to return to this part of the page.)

![]()
DRUMS
The drums I use are made of rubber with a screw down lid. It is into these drums that a quantity of
stones and grinding medium are loaded, the loaded drum then being placed on the
machine. At one point I used to use
plastic drums as supplied with the machines but I found that these were noisy
in use and the lids wore out too quickly for my liking. The drums shown hold a load of 2 and a half
to 3 pounds of stone (1kg to 1.5kg) depending on the density of the
stones. Also, the size of the stones
loaded varies along with the weight. A
single stone up to 3 and a half inches in diameter could be accommodated in one
of the drums, or many more smaller stones.
The picture below shows the type of drum that I use for grinding and
polishing stones. Click on the picture
to see a larger version of it, use the 'Back' button on your browser to return
to this part of the page.

The whole process of stone tumbling and polishing (as I do it) involves 3 separate methods, 4 if you include breaking and cutting. Read on...
![]()
BREAKING STONE
Some stones are simply too big to tumble and in this case I may resort to what
could be seen as brutality. One of the
simplest ways of breaking a stone is to hit it with a hammer, I have a block of
Oak I use as an anvil. The only trouble
with this is that splinters tend to fly off.
To get round this I wrap the stone in a piece of cloth. A bit of controlled violence can quickly
render a stone into much more manageable pieces. The disadvantages of this
method is that although the stone can be broken up there is limited control
over the shape of the stone. Also,
hitting the stone tends to introduce small cracks which can spoil parts of the
resultant smaller stones. Lastly, it can
generate a lot of splinters which are in effect wasted stone.
At other places on this page I mention cutting and grinding... Some stones destined for polishing can be quite large and may require breaking up. In other cases a stone may have cracks or other defects that would spoil an otherwise nice looking stone. Lastly, it may be that a stone has to be shaped.
![]()
CUTTING STONE
When a stone requires treatment prior to tumbling or polishing I set it aside
for cutting and grinding. For this I
have adopted what may be an unconventional use for a tile cutter. At various outlets one can buy what is
basically a circular saw blade, diamond-tipped, which rotates at right angles
to the machine's table and protrudes above it.
(Think of a circular saw table for cutting wood and you have general
idea.) Below the machine table is a
small water reservoir; the water acts as a lubricant and coolant. Set in motion the diamond blade spins up and
now offers a very powerful cutting and grinding tool.
As you may know, diamond is the hardest substance known to man, so what you now have is a tool that will cut any stone. Not only that but the side of the cutting blade is also diamond-coated so not only can the machine be used to slice a stone it can also be used to grind the surface of a stone. This means that almost any stone can be cut and ground to a desired shape and size.
I often use the machine to deliberately shape stones but it must be said at this point that the cutting and grinding process has a couple of drawbacks. It is both noisy and messy; Noisy to the extent that I always wear ear defenders - not the ideal machine to use at midnight; Messy in so much that the machine tends to generate a lot of water spray while in use. One final drawback is that as some stones are cut small fragments are liable to fly off in all directions - safety goggles are a must!
These machines are really designed to cut ceramic tiles and the like but they are quite effective on stones (which are invariably much harder and more difficult to cut than a tile). The advantage of processing stones this way is that cracks, splits, indentations, and other flaws in a stone can be rapidly removed. For example, a cracked stone could be cut along the crack resulting in two smaller stones but ones which after cutting will have no flaws; A stone could be purposely cut and ground into a specific shape to make a pendant; A small peak or indent in a stone could be ground off to produce a flatter surface suitable for subsequent tumbling and polishing.
![]()
GRINDING STONE
The advantages of cutting and grinding are numerous. Apart from being able to control the shape of
a stone it can also save time - a small pip of stone could take weeks of
tumbling to remove with the resultant loss of other parts of the stone as
well. In some instances I have cut and
ground a stone and after as little as 2 weeks of coarse tumbling it is ready
for the later stages - otherwise it could take 10 or more weeks! In practice, small stones, down to about half
an inch size, can be processed this way.
Anything smaller and I'll either let the tumbling processes take care of
the stone, or work on it with a small diamond grinding point and electric
drill. In many cases this cutting and
grinding is done before the next stage...
One of the problems with the cutter I use is that the diamonds on the wheel are quite large and the finish they leave can be quite rough. The cutter is ideal for rapid work but lacks finesse. For finer work, shaping, flat surfaces, smooth curves I use flat lapping discs. These are flat steel discs coated with various grades of diamond, the discs I use are six inch (150mm) diameter. These are mounted in a vertical drill press, cooling and lubrication provided by a drip feed of water and a tiny amount of liquid soap.
Use of these laps is much quieter and less messy than the cutting machine and allows fairly precise grinding of stones held by hand, even if using a coarse lapping disk. I use 6 grades of lapping disc: 100, 280, 600, 1200, 3000, and 50,000 grit. Use of the first two, coarser grades, is surprising fast at smoothing stone and can allow a stone to miss the coarse tumbling stage completely. Exceptionally flat and/or smooth and/or curved surfaces can be ground with these laps.
With patience and care it is possible to grind facets onto a stone as well. Moving onto the finer grades prepares the stone for polishing, done with the 50,000 (0.5 micron) grit lap. With these discs it is possible to hand work stones into shape and polish them in as little as 20 minutes. Larger or more complex shapes take longer but a rough time is about an hour from start to finish - a tiny fraction of the time taken by tumbling - and with complete control of the shape and degree of finish.
![]()
STAGE 1 - COARSE TUMBLE AND GRIND
This is where a quantity of stone is loaded into a drum. Added to this is a small amount of 80 grit
silicon carbide and the stones are then covered with water. A small amount of air is left at the top of
the load. These quantities have to be
fairly well judged - too little stone and the excess space means that the
stones smash each other - too much and the stones don't grind against each
other. Too little grit and the stones
don't wear down. Too much grit and some
will be wasted.
This mixture of stone, grit and water is then sealed inside the drum and the drum put on the machine. This load will then tumble for about one or two weeks. After that time has elapsed the machine is shut down, the drum lid removed, and the contents put into a sieve and washed. The resultant slurry, a mixture of ground stone, grit, and water, is washed away. It is often worth removing the stones from the drum by hand since this will leave the slurry in the drum. This slurry can be allowed to settle, the water drained off, and the sediment checked. In some cases grit is left behind and this can be left in the drum for future use, saving money in the long term.
Depending on the hardness of the stones in the load it may be necessary to go through this process many times, up to 10 weeks or more is not unusual if I want good results from stones that are fairly rough and are also quite hard. Once the stones have been washed and dried they have to be inspected for any flaws or cracks. Any that are defective will have to go through Stage 1 again. Before any progress can be made the stones must be smooth and free of defects before they are ready for Stage 2.
Very smooth stones and other well rounded, smooth stones may need only a few weeks going through Stage 1 but jagged and other badly flawed stones could take months to smooth so I often set aside badly flawed stones for cutting and grinding. In many cases some stones destined for polishing have to be broken up in this fashion before it is suitable for the coarse grinding process. (Many 'off cuts' are quite attractive in their own right and a selection of small stones, all of which are off cuts, can be seen further down this page.) After several weeks of Stage 1 stones start to emerge that are suitable for the next part and if enough are ready to correctly load a drum I can then go onto Stage 2...
![]()
STAGE 2 - FINE TUMBLE AND GRIND
Although I say 'Fine Tumble' this stage is sometimes referred to as a
'Pre-polish'. Stage 2 is similar to the
first except that 400 or 600 grit Silicon Carbide is used instead. Stones going into a drum must be washed
thoroughly to exclude any trace of the coarse (80) grit. The drum and its lids must also be removed
and thoroughly cleaned to remove any trace of the 80 grit. Having said that, I tend to reserve a drum
specifically for this stage, this further reduces the chance of grit
cross-contamination.
The picture below shows the three different abrasives I use. At left - 80 grit Silicon Carbide; Centre - 400 grit silicon carbide; Right - Cerium Oxide powder. The ruler used for scale gives some idea of the size of particles. The 80 grit is a tad smaller than typical sand grains and the Cerium Oxide is much finer than talcum powder. (Click on the picture below to see a larger version. Use the 'Back' button on your browser to return to this part of the page.)

In some respects Stage 2 is the most important process of all. The loading of the drum is critical: As in the first stage too little stone will mean that the stones bang against each other but too much will mean that the stones don't tumble and grind against each other. With Stage 2 I leave the machines to turn the drum for at least 10 days. Since most of the grinding and polishing process I do is based around a weekly cycle I often leave a fine load to tumble for 2 weeks.
Even though Stage 2 is still a grinding process the 400 grit Silicon Carbide is very fine and after 2 weeks of grinding the grit has broken down into much smaller particles, probably in the order of 1200 grit or finer. (Those of you familiar with the likes of sandpaper or wet and dry paper will know that 1200 is pretty fine stuff.) Like Stage 1, the load is washed and cleaned after its cycle and the slurry washed away. By the end of this stage some stones will have attained great smoothness with a dull satin finish. They should now be ready for the last part - polishing.
![]()
STAGE 3 - POLISHING
As before, the stones must be thoroughly washed and dried before this final
stage. I reserve a drum each for Stages
2 and 3 to reduce the chances of cross contamination of grits and polish.
The same load that came from Stage 2 can be put straight into the polishing drum after cleaning. In this stage the polish used is a very fine pink powder called Cerium Oxide, although these days I have found that I get better results with Tin Oxide. When I say fine, I mean that the particles of polish are about typically less than 3 microns in size (about 8000 grit), that is, 3 thousandths of a millimetre! This powder is quite expensive but one bonus is that it can be used over and over again, it is not necessary to wash away the slurry or clean the barrel unless a stone has broken during the polishing cycle and fragments are impossible to exclude. The stones are tipped into a sieve held over a bowl so that the water/polish mixture can be saved for future use.
Lately I have started using Tin Oxide as a polish, so far with excellent results, if anything better than Cerium Oxide although the jury is still out on that one. In some cases, to pack the drum to help prevent breakage I use plastic pellets as a packing medium. The pellets tend to fill in small gaps between stones and generally smooth and aid the tumble polishing process. I have found however than the pellets can slow down the polishing cycle and nowadays I prefer to use small Flint pebbles that have already been polished. Even after 2 to 3 days some stones will already have a nice finish but since I tend to time everything on a weekly basis I leave the stones to polish for a week, or better still 2 weeks. This usually ensures that when I shut down the machine and check the stones they have all attained a very high polish.
My most recent addition to polishing techniques is the use of diamond powder. I've experimented with 14,000, 50,000, and 100,000 grit diamond powder with a polishing load - the results were stunning! I found that 50000 grit, just a single gram of it, was enough to render a superb polish on stones in just 3 days. Cerium oxide or Tin oxide loads for 3 pounds of stone in a drum typically weighs about 15-20 grams, several orders of magnitude more than the apparent diamond quantity needed. On the downside Diamond polishing powder is expensive.
Other polish techniques used over the last year or so include hand polishing. For this I use a 12 inch (300mm) piece of smooth plywood with a sheet of Chamois leather stretched over it. I then sprinkle a small amount of polishing powder (Tin oxide or Cerium oxide) onto the centre of the sheet and then work the stone back and forth by hand. This is quite effective for flat surfaces and with patience any convex surfaces. For speed and quality I use a similar technique but with a leather covered disc loaded with polish set-up on a drill stand. The stone is then held onto the disc. Some stones, particularly soft stones, do not always respond well to tumble polishing and this method will often yield satisfactory results.
Another method which works very well for soft stone like Malachite is the use of cotton mops. These are round discs of stitched cotton which can be set up on a drill. Closed stitched mops and Tripomax (brown) polish, and then open stitched mops and Superblue (blue) compound for the final glossing, will yield very pleasing results on soft stone. These last stages are the most rewarding of them all. Carefully selected, loaded, washed and inspected stones are completely transformed by weeks, months even, of the machines going constantly. On the other hand, individual stones can be worked by hand on lapping discs and then polished in under an hour. Whatever the method, as you will see in the next section of this page, the results are often stunning...
![]()
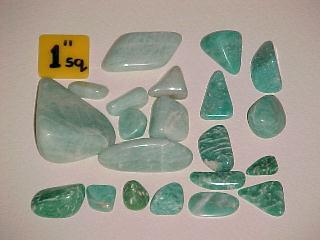
POLISHED STONES
There now follows a series of photographs of some of the stones that I have
polished. Each photo (bar the last one)
shows a yellow 1 inch square to give some impression of size. With every photograph, click on the picture
to see a larger version, use the 'Back' button on your browser to return to
that part of the page. In all cases the
polished stones shown below have been purchased or otherwise obtained as 'rough
rock' and then processed myself. In most
cases the stones shown are between 10 and 50 grams in weight although several
stones I have polished fall well outside these limits. All the stones shown I have cut, ground and
polished myself. The final photograph
shows an arrangement of various stones, all of which are off-cuts.


![]()
FINALLY...
So, in the previous sections of this page you will have seen some of the fruit
of many months of patiently waiting for the machines to do their work. The above photos are but a tiny selection of
the stones that I have polished since I first started the craft. I'm sure you'll agree that the results are
pleasing to the eye.
I have reached the stage where I still have a great deal of interest in the craft to continue polishing stone - but have little room to store the stuff! So, most stone currently on the go is destined for other people as gifts, or for sale, as well as stone that people have asked me to process. In this last respect I am happy to work stone for people upon request, e-mail me for details. Also I have a substantial quantity of polished tumblestones for sale, again, drop me a line for details.
So, there you have it, a rather unusual hobby and some of
the results. If you have any questions
about this page please do drop me a line, I'd be happy to try and answer your
enquiries.
Derek
Haselden
![]()

© Derek Haselden 2017